Friday, March 15, 2019

Finishing Tutorial for Fun & Fancy Free Sewing Roll


You are finished stitching the three pieces of the Fun & Fancy Free series and you are just not sure how to finish them. Hopefully this little tutorial will help you to complete them into a sewing roll. The model was stitched on three different linens, all the same thread count, 32 count. The tutorial will assume that three parts are stitched on three separate linen pieces, all 32 count.

In addition to the three stitched pieces, you will need fusible interfacing, cotton fabric and a ribbon for tie. A sewing machine will make the seams and hemming go much faster, but they can be done by hand if that is your preference.

1. Press the stitched pieces.
2. Trim the stitched pieces as follows. Assumes you are looking at stitched side of fabric.
               1. On part #1, trim 1" away from stitches on top, bottom and left hand side. Trim 1/2" away from stitching on right hand side.
               2. On part #2, trim 1" away from stitches on top and bottom. Trim 1/2" away from stitching on both left and right hand sides.
               3. On part #3, trim 1" away from top, bottom and right hand sides. Trim 1/2" away from stitching on left hand side.
3. Cut three pieces of fusible interfacing: 7 1/4" x 5 1/2". As per manufacturer's instructions, apply to back of stitched pieces, covering the stitching. The fusible will be slightly smaller, than stitched area, that is fine.


4. With a 1/2" seam allowance and with right sides together, connect all three pieces of stitching, aligning the cross stitches that form a continuous pattern. **Tip** - If you are having problems getting the cross stitches to match up exactly, stitch a "mini" seam right at the connecting points and then go back and stitch the entire seam length.
5. Press seams open to help distribute the bulk for the hemming step.


6. Choosing & Cutting the Backing Fabric. You will need to cut a piece of cotton backing fabric 25 1/4" x 9 1/2". For the model, I used cotton fabric from Molly B's Studio by Marcus Fabrics, design # 4636-0116. When deciding on a backing fabric, I like to pull many options out to see what gives the look I am going for. The backing fabric, especially when part of it shows on the front as in this case, can really change the overall effect of the final piece. The following photos show how different colors of backing fabric highlight different areas of stitching. 


If I am having a hard time deciding on a fabric to use, because I am loving them all, I will clip or pin the fabrics around the stitched piece and take photos with my phone. Then I go back and review the photos and it really helps to isolate the piece to make the final decision. In this case, I used Fabric #3. Note how just the little bit of the cotton fabric color can change the overall appearance of the piece.
7. Press cotton fabric and then cut fusible for the cotton fabric, 25" x 9". Center fusible on back of cotton fabric and adhere according to manufacturer's instructions.
8. With WRONG sides together, center stitched piece on top of cotton fabric. Pin in place. You should have 1" of cotton fabric around all of stitched piece. Baste the two pieces together, 1/4" away from edge of cross stitched piece.
9. Hemming sides. Take the edge of cotton fabric, fold to edge of linen, then fold that piece up and over the linen. Pin or clip in place. **Tip** - I like to use Wonderclips when hemming! Work around entire piece, until it is prepared for hemming. Mitre the corners!! Stitch a 3/8" hem. Removing pins or clips as you stitch.


10. Choose a coordinating ribbon for the tie. I used a vintage grosgrain that is 1 1/2" wide. Cut the ribbon to a 28" length. Fold the ribbon in half and tack to left hand side of stitching in hem seam. 


11. You are all finished! You may want to give it another press, just to finish it to perfection. Be sure to press on the cotton side or use a press cloth if pressing over the needlework. Roll the sewing roll up and put into your stitching basket for a future stitch reference. Enjoy!!

Happy Stitching!! Beth

Tuesday, June 9, 2015

Inspiration piece for The Gift Keeps Giving


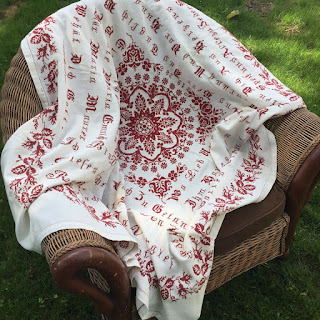
I thought I would share with you the inspiration piece behind my "The Gift Keeps Giving" chart. My daughter found this vintage 1928 tablecloth in a linen bin in an antique shop in Upstate New York last fall. She sent me a photo and said, "What do you think?" I sent her back a text asking for the price. She replied with a "knock me over with a feather" low price and I said, "Buy it!" She said, "I already did!" Boy, did I teach her well or what!! Once I had the tablecloth in hand, I couldn't quite decide how I wanted to proceed. I thought if I reproduced the entire piece, it would just be too large. Not to mention, the writing is in Old German, so it wouldn't have a lot of meaning for a person to stitch. I finally decided to just use the piece for inspiration.


Once you let yourself veer from the original, your imagination can just take off. So, that is what I did. I could translate the gist of the writing from my limited German. I could decipher that the tablecloth was a gift from an aunt to her niece. My guess it was a favorite niece, since both of their names were Maria. I could also gather that the wording contained a blessing. From my study of old samplers, I knew that many girls created their samplers from pieces that older family members had created, so that is the direction I took for the sampler. The storyline in my head was the niece, Maria Maurer created her sampler from motifs on her aunt's tablecloth. The tablecloth contained letters from two different alphabets, an Old English Blackletter and a script. I chose the Old English as the dominant font and sprinkled a few of the script letters for added interest.


For the sampler and needle book, I used Astilbe floss* from Dragonflylotus Designs. This is a hand-spun (hand-dyed) one ply silk. I have had requests for other flosses that I would recommend, so here is a list. Of course any red will do. I like the idea of a variegated red, one that covers the spectrum from light to dark. That way the result is a good aged look with the lighter pink colors, just like the color had been bleached from the sun or many washings.
If you would like to stay with a silk:
167 - The Kimberly (Dinky Dyes)
205 Carmine Rose (Gloriana) - this is a little pinker than original
248 Dutch Red (Gloriana) - the red is a little browner 
For a cotton floss:
0511 Country Redwood (GAST) - red is a little more on the browner side and doesn't get real pinky
7036 Geranium (GAST) - pretty good match
190 Lady Bug (Classic Colorworks)
2263 Begonia (Weeks)
*Just a note about the yardage listed on the chart. I used 3 - 25 yd. skeins of the Astilbe floss. The 25 yd. skeins are no longer available, the increment is now 10 yd. skeins. You will need approximately 75 yds. or 8 - 10 yd. skeins. My apologies for any confusion. 


For the Lone Elm Lane Shaker box top, I used Cayenne from Weeks Dye Works for the floss. This is a beautiful color of red and the sampler would look lovely stitched in it as well. I hope you enjoyed the inspiration tablecloth and have fun stitching the chart! 

Always be stitching,
Beth

Tuesday, February 10, 2015

Postcards from the Heart - assembly video


Hi Stitching Friends!

I have created a video tutorial, so you can see how I have assembled my "Postcards from the Heart." The feature "Postcard" is Home, which will be released at the end of April. I hope you enjoy.

All my Best,
Beth

YouTube video - Postcards from the Heart - finish assembly tutorial

Some suggested "found objects" to add to your "Postcards"
• Cancelled stamps
• Ribbon/Trim/Rick-Rack/Lace/Fabric
• Yo-yo's/Wool Pennys
• Buttons/Sewing Notions/Needle Packs
• Charms
• Old Letters/Poems/Pages from old books
• Typewriter Keys
• Game Pieces - Dominos/Scrabble tiles
• Skeleton Keys
• Outdoor house address letters/numerals
• Bottle cap
• Natural pieces - feather/acorn/pinecone/shell
• Old wallpaper
• Watch fob/Clockface
• Photographs/slides/viewmaster reels
• Old Jewelry - pins/bracelets/earrings
• Souvenirs - ticket fobs/old advertising/maps

Tuesday, April 22, 2014

Correction on Rebecca's Primer

Hi Stitchers!

I wanted to let you know about a correction on Rebecca's Primer that has been brought to my attention. The symbols for Mustard Seed and Dark Chocolate are reversed on the floss key. My apologies for the mistake.

All my best,
Beth

Thursday, February 20, 2014

2014 Nashville Releases

Hi Stitching Friends!

The Nashville Market was completely awesome this year! We ended up leaving from home a day early and driving a different route to avoid the "Pax" storm, but were so glad that we didn't miss the show. It is always so inspiring to see everything new that is happening in our industry and to talk and visit with old friends and make new friends. So, without further ado, here are my new releases!


Sakura


Sakura is a continuation of my Baltimore Bride series. And like her sisters, Sylvania and Corona, she is a fun whimsical design. Sakura, as her name implies, features a nosegay of cheery, cherry blossoms bursting from the center of the design. This series takes inspiration from Baltimore Quilt structure. I mixed things up a bit in Sakura by taking the circle and breaking it into quadrants and turning them outward. She was stitched on 28 count Doubloon Cashel linen from Picture This Plus using DMC floss and framed in an East Side Mouldings frame. Here is a close up look!


Love Is...


I tried something a little different this year and offered a limited edition kit to the shops that attended Market. I hope you are one of the lucky ones whose shop picked up a few kits, as they completely sold out! The sweet little pin cushion kit comes with everything you need for completion, except the stuffing. It includes 30 count Straw linen from Weeks, a full skein of Currant floss from The Gentle Art, backing fabric, chart and instructions for completion and the best part, a skeleton key, which you attach to the braided floss fob. It is a great little piece to remind us that Love Is... the key, the answer, all we need!

A Bee in Your Bonnet


Sometimes when I am designing something, I just can't wait to start stitching it and that was the case with A Bee in Your Bonnet. I, like so many other stitchers, just have this thing about bees, maybe it is because they represent the good things in life. Their hives are found out of doors, flowers are their haunts and they are always just so industrious. And we can not talk about bees without mentioning the fruit of their labor, honey, a wonderful ingredient in so many delectable recipes. So we stitch our odes to bees. The main chart in the leaflet is stitched on 32 count Beige linen from Weeks Dye Works with floss from The Gentle Art. No, I did not make a typo, 32 count from Weeks is correct. Weeks has introduced some new thread counts to their linen line-up. Very exciting and the fabric was wonderful to stitch on. Frame is also new offering from East Side Mouldings, their Crazy Daisy moulding. The hive is stitched in Algerian Eye stitch and it gives just a bit of texture to the piece. Here is a close up.


The Land of Milk and Honey is the second project in the leaflet. I finished it into a sweet cross body purse. Finishing instructions are included, so you can do the same. I stitched it on 40 count Strawflower linen from Lakeside Linens with floss from The Gentle Art. I donated my purse model to The Great Model Giveaway at Market. Dianna & Liz from Fancy Works in Bloomington, IN was the lucky shop to go home with the model. So, if you are anywhere near their shop, go check it out!


The Ties That Bind

In October of 2013, while relaxing at the PALS stitching retreat in Myrtle Beach, SC, Cathy Habermann of Hands On Design and I decided to create a collaborative design. We sat and discussed different thoughts and went home with a (very) rough sketch of the piece and the idea that we wanted to use the favorite hymn, Blest Be the Ties That Bind, in a needlework verse. Cathy was struck with the verse variation that we used in the final piece during her plane ride home. But, that original sketch was changed so often, that really there isn't any left of it. We had a great time working on this piece over the course of several months. Since Cathy is in IA and I am in PA, we used the miracles of technology to help us with our meetings, we FaceTimed! This piece has truly become a celebration of friendship in needlework. The main chart is offered in two parts, the first is available through Hands On Design and the second part from me. Both charts are available now, so you don't have to wait for the second part to be released. The main chart is stitched on 36 count Cocoa linen from Weeks Dye Works (again, the 36 is correct) with floss from The Gentle Art. The piece does contain snippets of specialty stitches and makes a great learning piece if you are unfamiliar with the stitches. As always, you have the option of just stitching them using a cross stitch. Stitch diagrams and instructions are included.


Also included are charts and finishing instructions for accessory pieces. My little projects are this sweet scissor pocket and scissor fob. I have a little story to share about the red winged blackbirds. This little design is dedicated to my sister, who is also an avid stitcher. Years ago, when we would be riding in the car together, she would always be pointing out red-winged blackbirds. I would look, but never see them. One day, it dawned on me that I was looking for the wrong kind of bird, thus we always have a chuckle over red-winged blackbirds.


Cathy's accessory pieces include a needle book and biscornu. All of the small projects would make lovely gifts for your stitcher friends! 


That wraps up everything NEW at the Summer House. Of course, the shops did get a sneak peek at the next release coming your way April 15... 

Enjoy the new designs and always remember that I love to see your stitched pieces, send me pics!

Take care and always be stitching,
Beth


Wednesday, February 12, 2014

Nashville New Releases are coming...

Hi All!

Images and info on my newest designs will be posted on Valentine's Day. So sorry for the delay, my travel schedule has changed due to the winter storm.

All my Best,
Beth

Tuesday, July 9, 2013

Facebook Page

facebook-logo-jpg

Hi Stitching Friends!

Did you know that Summer House Stitche Workes has a Facebook page? Well there is one and now you can link to it from my blog page. I finally figured out where I had to put the code to accomplish this little feat of technology. Just click on the link to the right and it will take you right to the Facebook page. When you "like" the page, you can stay up to date on the latest happenings here at the Summer House. I post little snippets to Facebook that don't appear on the blog. So please "like" Summer House Stitche Workes.

As Always,
Beth